UA-47203708-1

Saturday, December 13, 2014

Merry and Bright

One week of school left.

One week until we fly to France.

One last bunch of Christmas gifts to wrap.

Remember these little babies?

 I made a heap of chocolates at the time, knowing full well Mr Frog would change his mind about not giving gifts to the teachers in his office at the last minute.

As it turns out, the teachers in Mr Frogs office, teach Japanese. So, having also studied Japanese at school (for six years!) I was a little inspired.

Today we practice the Japanese art of Furoshiki.

First, pop your choccies in a little plastic bag and seal.

 Next, cut a rough square out of your chosen fabric. Mine are about 15x15cm, but it'll depend on the size of your pressie. Place the packet on top of the wrong side of fabric. I put it at the opposite angle so I didn't need to use too much fabric, and so it would look a bit neater.


 Take two opposite corners and tie a knot.


 Then take the remaining corners and tie another knot. If you have enough fabric, tie another knot to secure. I was being frugal.


 Voila! Or should I say dozo.


  I had exactly four plain chocolates left, so I made this up, just because.
 A bit of Kikki K twine, some Washi Tape (did you know it's Japanese?) from Kaisercraft, and that is a very cute little parcel.


That's it from me for the year. I mean it this time.

I hope the holiday period is just fabulous,

Merry and Bright,

and keeping praying my Christmas is WHITE!

MC


Sunday, November 30, 2014

An Itty Bitty Xmas Gift

Last year, I nearly gave myself an ulcer making fabulous gifts for the fabulous women in my mothers group. It was ridiculous, and just another example of how I often expect too much from myself.

Do you do this? I'd like to think it was a mum thing, something I could be at least a little smug about, but it turns out that motherhood has just put a great big magnifying glass over the habits, traits and "issues" that were already there.

Anyhoo. This time I was good. This time, I made an effort without breaking a sweat, and talked myself down from going over board.

You might say my mothers group were ripped off this year.

All they got this year, was this itty bitty box of homemade chocolates.


And when I say homemade, what I mean is, I poured some melted chocolate into a mould and put things like almonds and crushed mint lollies in them.

You don't have to make the chocolates either. Buy some wrapped ones and pop thoses into a little box. Or tailor it to the recipient. Do they love Skittles? Fill it with Skittles. Make a bunch and keep them hany for those times you realise it would be nice to give Rhonda from work who you only see in the tea room, a little something for xmas.

1. Fill a little box with chocolates or lollies, homemade or otherwise.


2. Tear strips of fabric (for that rustic look) or cut lengths of ribbon, so they're  not quite as wide as your box. Oh, and it doesn't have to be "xmassy". Trust me. It's quite freeing.


3. Tie a bow. To get it looking perfect it takes a bit of faffing. I always do a test run first, then cut my lengths (or tear) to match. To get an even length, you need to start with one side longer than the other. Or simply trim and be done with it!


4. Repeat.


Voila! Cute little pressies people will be happy to receive, and you'll be even happier (and ulcer free) to give.

We're off to France for Xmas (please pray for snow!), so if I don't see you before we leave,

Shop Local, Buy Handmade, and remember, Happiness is a New Handbag.

Joyeux Noel!

MC

Tuesday, November 18, 2014

Pressed Metal, The Not Quite Tutorial

Remember these box/shelf thingy's?
My Wedding Expo display

I thought they looked great at the wedding expo. Black and white, bold, simple. Mr Frog/Mr I-Always-Have-A -Bloody-Opinion thought they looked too modern. "Your style is "Vintage"" he said.
Damn.
He's right.
Although it did look great, something a little more vintage would look even better.
But what? For awhile, I was thinking black and white damask scrapbooking paper. Easy Peasy.
But then I remembered something I saw on Bloody Pinterest.
Pressed Metal.
I adore pressed metal. I dream of having a Silver Pressed Metal splash back in my kitchen.
I didn't actually go to the original source. It seemed pretty simple. And it was.

Simple, yet I think, incredibly effective.

First, cut your cardboard to size. I used a random piece of cardboard and stole the giant box of un-opened Cornflakes. (Remember, Already had = Free)


Then I marked out my pattern. You know me, I kept it simple. This is a little less fancy than I imagine in my dream kitchen.

I then went to town with the hot glue. If you're doing this with kids, you could probably use P.V.A glue, it'll just take longer to dry. So scratch that, and just let the kids design while you take command of the glue gun. (There's gotta be some perks to being the grown up).
Be careful not to make the glue to high/thick. It'll tear the foil.

Next, lay the foil shiny side down and put your cardboard glue side down. Fold over the edge of the foil, carefully, and tape down.


 Flip it over and gently rub your hands over the foil.

 Then go over again with more attention to detail.

 Now remember when I said gently and try not to make the glue too thick...? This is why. The foil won't like it. And neither will you.

 Nevermind. Pretend it didn't happen and continue with the next two pieces.

 It's about this time I heard a little voice in my head saying " It doesn't look as good as you thought huh?".
Doubting bitch. I Ignored her and carried on.

It looked promising. I had such high hopes.
Hmm. Not quite how I imagined. I stared for a bit. Maybe it'll look better with a bag in there?

 Maybe up close?
Hmmmm.
Maybe with the black bags instead. Yes, that's it.

 I couldn't work out why it didn't look like I thought it would. The first piece I did was awesome. I even posted it on Facebook. (So it must be true).
Then Mr Frog chimed in.
In his "I'm trying not to sound like the critical pain in the arse you think I am" voice, he said "Do you like it babe?". I paused for a second too long and he continued with "It just looks like foil".

GAAAAAHHHHHHHH!!!!

He is a critical pain in the arse, but when he's right, he's right.

Now it just looks like a conspiracy theorist has gotten a little fancy with the foil on the windows.

Sometimes, things don't work out the way you think/hope/wildly assume they will. And part of the "fun" of being a crafty minx is working out how to fix things when they don't quite work out fail completely.

I went back to plan B. well, plan A really.
And I got to go to Kaisercraft. So, that's a win.


 A black damask acetate (After Five Collection,  Champagne), on white paper.

Simple, black and white, bold, Vintage.

And I didn't swear once.

What have you stuffed up and then fixed lately?

MC

Thursday, November 6, 2014

My Ladies and Friday Nights

A while ago, I started a page here to show off my own collection of much loved handbags.
Crappest pic ever.

I posted once, and couldn't work out how to do it the way I wanted, so I didn't do it again.

I'm now showcasing my Ladies and (I hope) providing a little inspiration for a Friday night out on the Madame Clochette Facebook page. (Just type Madame Clochette into the FB search bar and you'll find me easy). The aim is to pick out an outfit as if I was going out ( if only) and team it with a bag I own, and one or two from the Madame Clochette range available on Etsy.
I felt the need for Colour today...

I've blathered on a bit on Facebook about gorgeous ladies pairing their giant handbags they use all week with fabulous outfits over the weekend. It just hurts me to see this happening. It's just so unnecessary. As you'll see from the coming weeks, most of my own collection cost very little. You don't need to spend a lot to look fab, and more importantly, you don't need to stick with the safe black clutch. Although, you will need to at least own one.

I hope to have you dusting off your own collection and maybe even trying something a little different. And hey, maybe you'll even buy a Madame Clochette Cocktail bag. They're one of a kind, just like you. Perhaps you'll just downsize your current monstrosity and stop killing me.

It's a win no matter what.

MC

Oh, and apologies for the not so great photo's  coming your way. I'll aim to actually model the outfits and bags, but nap time is all too fleeting most days!

Sunday, October 26, 2014

A Pretty Bathroom, Eventually.

The bathroom has become the first finished room of the house.

All we needed was something for a funny spot on the wall, in between the shower and the doorway. I contemplated going the French "Le Bain" (or la, I never know!) route, but it just didn't really fit with how the room had already evolved (without a fight). We'd gone the textured, natural look and it was soothing and clean, and pretty, without being "girly". I'd already made this Tissue box cover so it was only natural to continue in that vain. Another trip to Kaisercraft where I spent my $20 loyalty gift card on random scrap pads and some very specific papers. The Basecoat range was perfect for my project. It features great colours and texture up the wazoo. Once I'd chosen my papers and bought my canvas, I was ready to go.


I started by mixing some white paint with PVA glue and painted the edges of my canvas. I don't really know what I was hoping to achieve by doing this, maybe a bit of texture, or the opposite? Anyhoo, it didn't make too much difference, so we were all good. Then it was a case of working out how exactly I wanted to use my papers.
 I was really expanding on what I did in Tadpole's room, but I didn't think squares were going to cut it, plus my canvas was 51x51cm, too tricky to do even squares. I considered some kooky patterns, but in the end, I went with my usual style; Simple. Stripes it was. After a few practice line ups I was ready to get gluing.

Never glue things in a hurry.

 You end up making a mistake (gluing whole sheets down instead of cutting one) and having to pull it all off while it's still kinda wet. You end up with a lumpy mess on your canvas that needs to be sanded back. Of course you'll have to wait days to do this because you have a Tadpole.

Anyhoo. We start again, and this time, even though I was pretty fast at it ( but in a fun I can't wait to finish this kinda way) I did a pretty good job.


But something was missing. It kinda faded into the wall a bit.

It needed something more. So, I painted the edge of the canvas (again) with brown paint, carefully matching the browns already in the papers. The PVA from my first attempt actually made the texture of the canvas stand out more, and considering this thing was all about texture, I rolled with it.

 Now see that bit on the far left? That's what happens when you stop paying attention and cut the paper the wrong size. I still need to go back and glue it down better, but you can't tell once it's on the wall.

See how the bottom is curved? That's what happens when you buy your canvas from Dollar King. Whatever. Mr Frog turned it up the other way and you can't tell.

This little section of the bathroom was the inspiration for the canvas.

The finished bathroom, before Mt Frog flipped the canvas, and complete with his P.j's hanging on the door. He's not impressed that I left them there to take the photo.

Pffft. I'm keeping it real.

This post wasn't sponsored by Kaisercraft. But Kaisercraft.... Call me.

MC

Wednesday, October 8, 2014

The Cupboard of Creation

I've been organising my craft cupboard. For months.

It's not because I'm lazy, although, I can be. It's not because it's a craft cupboard and not a craft studio-entirely-separate-from-the-house and totally fabulous. Although, that would help.

It's because of this.


I'm a mother now. Which means things that used to take no time at all unless I got distracted by "inspiration", now take forever. And you can forget about pouncing on inspiration when it strikes you. I'm more likely to be pouncing on a toddler desperate to get into the cupboard and her hands on all-of-the-things.

But I digress.

I have long had my idol/girlfriend Rebecca's $75 craft room and craft hutch as inspiration. Nothing would make me happier than turning some old stuff into beautiful storage for the things that help me make beautiful things out of some old stuff. (And the cocktail bags, book covers, cards and whatever random craft takes my fancy).
And of course, there's bloody Pinterest. Full of gorgeous craft rooms and studios and things that I don't have! I have a board dedicated to the art of craft storage. I've spent way too long drooling over other peoples organisation. And crafts, and supplies, and money, and time.

But I digress.

In our last house, I had a craft shelf. So, things are looking up.

Here are a couple of horrible before pictures of my cupboard, which is unfortunately in the baby's room.


 One of those containers doesn't even fit properly. Who knows where anything is!


What if there's a glitter emergency?
The box labelled "Pram" contains jars. And then there are more jars to the right. It's my latest thing.


 O.k. So it was a mess. The problem with all the bits and pieces is that there are lots of different bits and pieces. There are lot's of great ways to store things, but those solutions mostly only apply if you have an entire room. Luckily, I love a creative challenge, and finding ways to do things a) on the cheap and b) as pretty as possible are right up my alley.

So, here are the after pictures.

O.k, so it's not what I'd call pretty per se...

Pretty good yeah? Well, at the very least, everything has a home and it's mostly labelled so I don't have to remember where I put things.

I'd like to thank Pinterest for the IKEA bag holder as wrap holder idea.


I bought the drawers from Kmart. They were the cheapest at $15 for a set of three drawers. Brilliant! They're holding scrapbooking paper pads, stamping stuff, textas,pencils and paints, card making supplies, stickers and rub-ons, and scrap material. Above them is my box of Madame Clochette Cocktail bags waiting for a new home. (In my dream house there is a lovely shelf for them to be displayed on. There's also an outdoor spa.) On top of that are my box of ribbons, my "current projects" box and a mini chest of drawers I'm currently using for zippers and stuff.


The top shelf, now not a safety hazard. 


The top shelf was a debacle. Now everything is all lined up nicely. On the far left we have my market stuff: props, shelving, point of sale, etc. Then the small clear box holds my Madame Clochette bridal bags, al in their own dust covers. Above that, I'm pretty sure it's more market stuff. I really need to finish labelling.Tucked in the side is the baby album I am still yet to start for Tadpole. Then the box of bangles and jewellery I use for my bags. The rest, I think you'll find, are all helpfully labelled.

This poor shelf was doing it's best before, but now the working conditions are so much better.

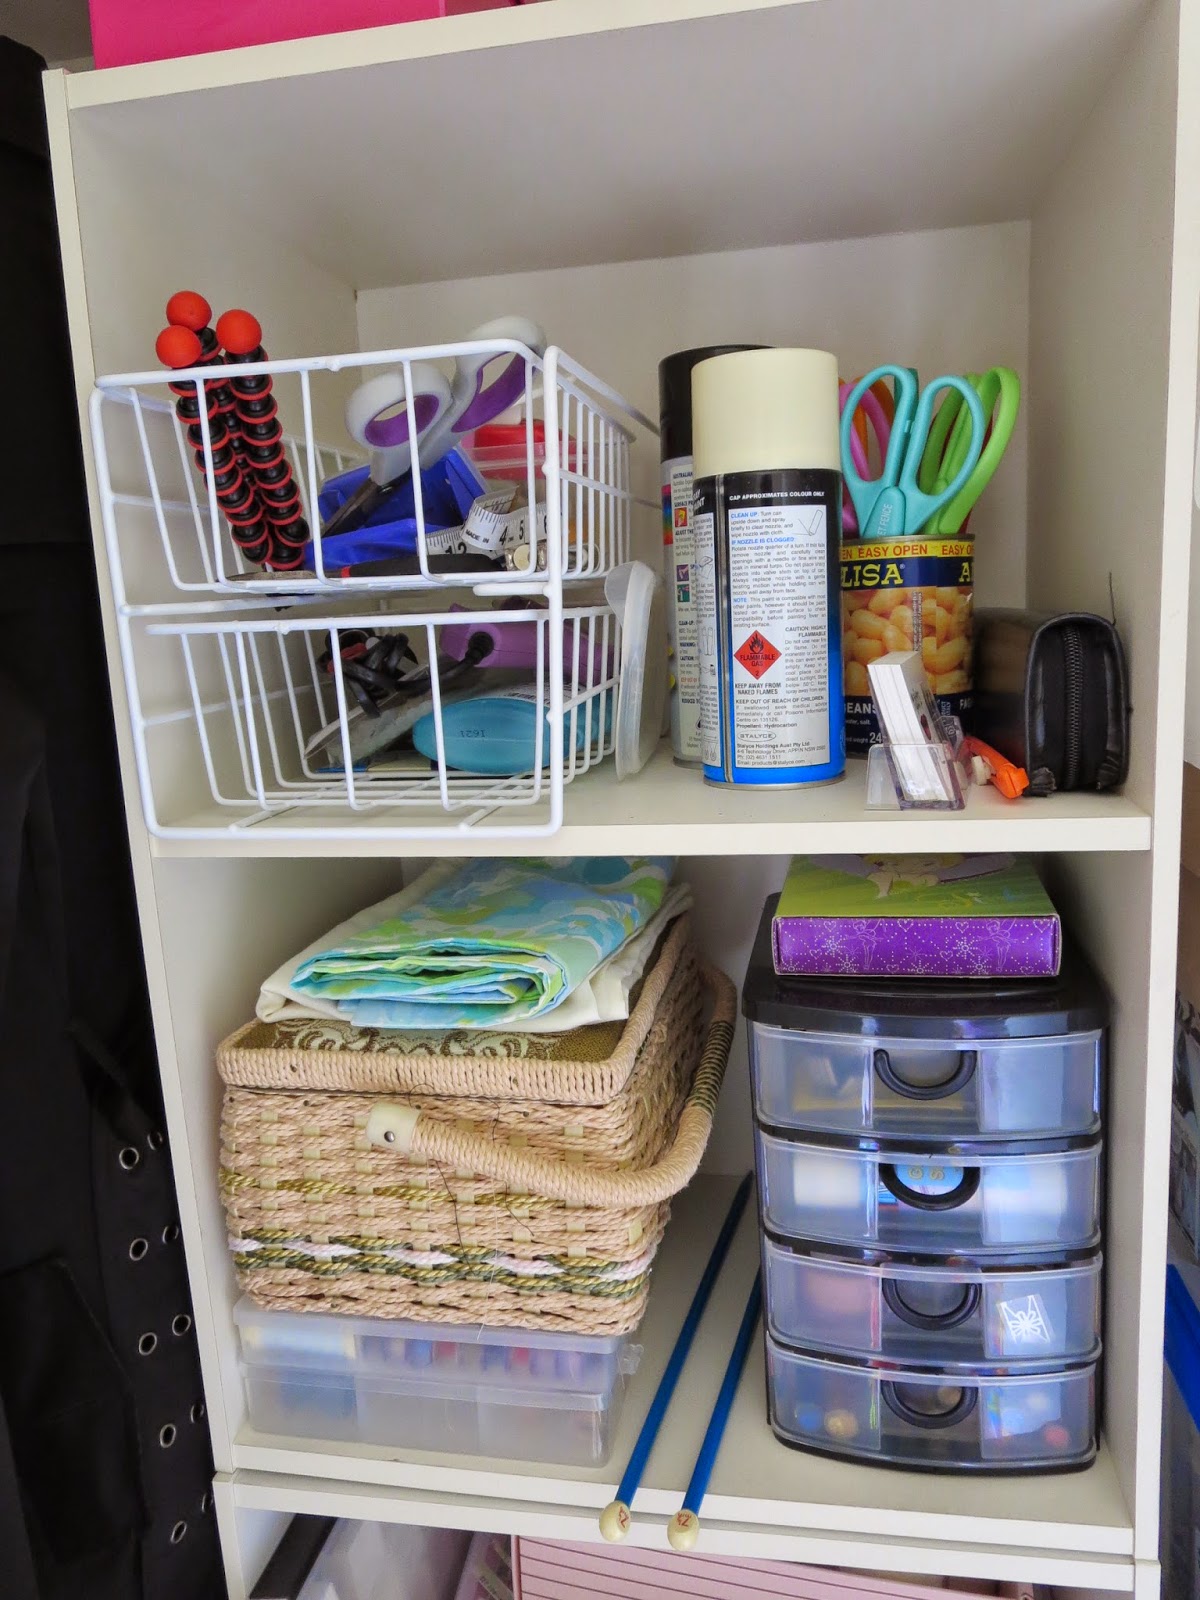
Top shelf is for tools, things I use often like glue and scissors. And a handly little stash of business cards. We then have my ancient sewing kit sitting on top of my ever growing collection of thread. The cute little drawers are holding random odds and ends like magnets and plain hair clips, more glue and tape, washi tape, and the ever important glitter.

I'm trying out this idea for fabric storage. I'm undecided.

Paper storage is my downfall. I really want to have it all separated and ordered, but I can't bring myself to by the only wide enough office trays I can find from Officeworks ($36 for six, technically not expensive, but...) Perhaps I'll cave though, because finding what you need in all of that is a pain! Beside the paper are more stamp pads ( bought for a steal at a market) and above are left over Bath Milk bottles from last xmas.
To the left of the shelves there's a box for all my project supplies... like MDF things, mini canvas etc. I can't remember what's in the bag on top. What did I say about labelling...?

So, there you have it. The organised, if not very pretty Cupboard of Creation.

Here's to the next project. Coming soon.

Any thoughts on a better way to store my crap? I'm all ears!

Thursday, September 11, 2014

Confessions of a Craftaholic

So... while I've been good, organising my craft cupboard , I've also been bad.

I've been rummaging through the recycling bin again.

O.k, so it's not that bad. It's not like I'm pulling things out of the garbage bin and wiping off the food scraps. And really, it's a good thing. Not only am I "up-cycling" like a hipster, but it's getting me out of my crafting funk. We'll get back to that shortly.

First, look what I made!
Not the flowers of course, but the little container holding them.

It used to be one of those little probiotic  milk containers ( you know the ones that taste like sugar but are meant to be really good for you? Don't look at me, Mr Frog is into it) wrapped up in a little white paper bag. Frankly, anything "tied up with string" sends me right over the happy edge.

This was a last minute birthday gift for a friend from mum's group. Gotta be happy with a little posy that comes with it's own vase.

Now, about my mojo.

It's kinda gone walkabout since the expo. All the work I put into it before hand kinda left me a little empty. So, I'm organising the craft cupboard. The fun part of this is that I can see what I actually have, including all the crazy bits and bobs I keep "just in case". Surely my mojo is there somewhere.

Should probably get rid of some junk.

Maybe.

Anyhoo, I've got lots of ideas for projects, I just can't be arsed. I do have visions of an amazingly tidy and inspiring craft cupboard... in lieu of a separate studio in the yard of my four bedroom with study weatherboard dream home.

*sigh*

How do you organise your crap extremely important supplies?

Stay tuned for the Cupboard of Creation and the Return of my Mojo.

MC